TestModeller.io - Selenium Java Tutorial

Welcome to the TestModeller.io selenium tutorial for the Java programming language !

In this tutorial we'll be covering how to get started with TestModeller.io for selenium using a Java automation framework.

This is aimed for first-time users along with users who have an existing java selenium automation framework.

A demonstration of Test Modeller for Selenium Java Automation Frameworks covered in this tutorial.

1. How it works

TestModeller.io is a browser-based solution that enables users to:

  • Model a system under test as BPMN-style flowcharts.
  • Automatically generate test cases from the model, optimising testing for time and risk.
  • Define test data at the model-level and generate data at the same time as test cases.
  • Define test automation, automatically executing tests generated in The VIP Test Modeller.
  • Analyse test results and manage existing artefacts, with visual dashboards and a file management system that introduces traceability between test assets.

This quick start guide provides an overview for new users to get started with creating automation for a Java Selenium based automation framework to quickly start creating models and associated automation.

For Java Selenium this means creating models which automatically generate Selenium code in Java which can be directly plugged into your framework seamlessly

TestModeller.io a modelling tool which creates the perfect set of tests into a wide array of test case management systems, and automation frameworks. Along with overlaying the right test data to support your testing.

This section is by no means comprehensive and intended as a quick start guide. If you wish to learn more about modelling we recommend you review our knowledge base along with our video tutorials for a comprehensive guide to creating models and test automation.

The goal is to equip the reader with the working knowledge needed to get started with creating java test automation to test their own systems and integrate into their own automation frameworks. With TestModeller.io, this means automatically generating complete automated test suites from models that are quick to build and easy to maintain.

2. Prerequisites

Install Prerequisites

Here we'll be installing all the prerequisites you need to get started with Selenium test automation in Java.

  1. Create a free TestModeller.io account
  2. Install the Java Development Kit - NOTE: The example framework targets Java 8 only out of the box.
    • Download it from here and follow the associated instructions
  3. Install an IDE for editing Java code - We like to use IntelliJ editor, but Eclipse is also fine.
    • Download IntelliJ from here
  4. Install ChromeDriver (this needs to match the version of chrome you will be executing your tests on) and make sure you add it to your system PATH.
  5. Install Maven - this is used to manage the build process of our automation framework.
    • You can download the Maven binary Zip file from here.
    • There are instructions here. Make sure you add it to your system PATH
  6. Download our example Java framework (if you don't have your own).
    • You can download the framework from out GitHub repo here.

Test It's Working

Make sure to restart the Terminal or Command line prompt to load the new environment variables.

  1. Run mvn -v. You should see something like below:

  2. Run sample automation library
    • Navigate to the Java framework directory (this should contain the pom.xml file).
    • Run mvn test. You should see some basic login tests execute against the Magento webstore.
Tip
Execution on other web browsers...

In this tutorial we will be executing our tests on Google Chrome. You can use Firefox driver and Internet Explorer driver available from the Selenium website if you wish to interchange chrome for either of these browsers and beyond.

3. Configuration

Configure Test Modeller

All code created using TestModeller.io uses code templates which define the structure and type of code to be created. Test Modeller provides support for numerous open source frameworks out-the-box made available on the Curiosity Software GitHub page.

The sample framework provides pre-configured code templates within the ‘Code Template’ directory. To import these into Test Modeller follow these steps or watch the video below.
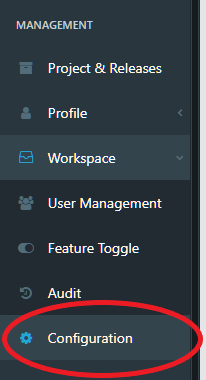
  1. Login to Test Modeller and go to the 'workspace' and then the 'configuration' tab


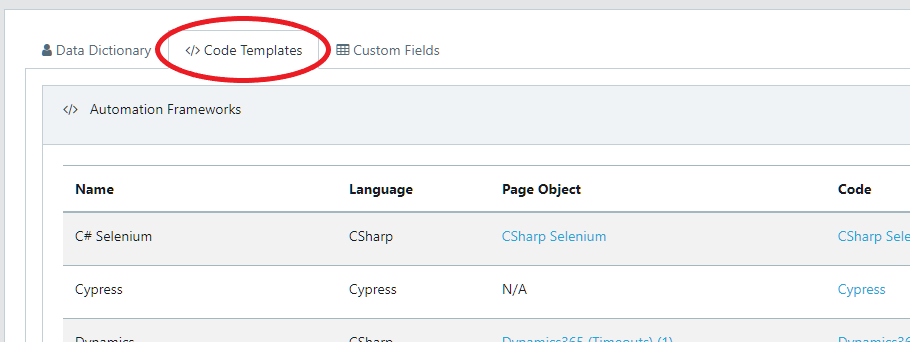
  2. Select code templates from the configuration view.


  3. Upload both the page object and test case code templates by selecting the ‘Import’ button next to the code template header.


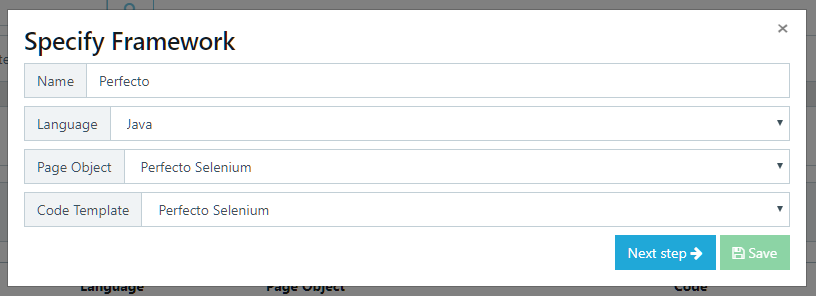
  4. Register a new automaton framework using the code templates. You will need to select the code template and test case templates which have previously been uploaded.


  5. Create a new project within Test Modeller which will be used as a workspace for our page objects and models created for consumption by the automation framework.

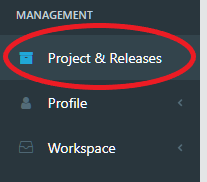
    • To do this go to ‘Project & Releases’. Select to create a new project and enter a suitable name for the project.


    • In the wizard select the automation framework you just created to bind to create the project. This tells Test Modeller to use this specific framework for generations (although it can be overridden at any time).


Note: This is using the sample framework and configuration provided by Test Modeller. You may have your own automation framework which you wish to utilise. This can be integrated into Test Modeller by configuring your own code templates. A video tutorial is available here.

4. Scan an existing web app

Scan An Existing Application

The TestModeller.io scanner is an accelerator for scanning existing web applications to quickly assemble and create page objects which can be consumed directly in your automation Framework.

Performing Your First Scan

  1. Install the TestModeller.io browser extension in your Chrome web browser
    • Login to the TestModeller.io portal you have registered with.
    • Navigate to the TestModeller.io dashboard screen.
    • Click 'Install Recorder' and follow the link to the Chrome WebStore.
    • Follow the instructions to perform installation of the extension. Once it's complete you should see the extension available in the top right of the chrome browser.
  2. Open the browser extension by clicking on the extension icon. At this point you should be asked to sign in.
  3. Sign in to the browser extension with your credentials.
  4. Select the workspace, project, and release you would like to connect into.
  5. Perform your first application scan to automatically create page objects.
    • Make sure the extension is in scanning mode by flipping the switch to 'Object Builder' mode.
    • Hit the start button to begin.
    • Click on the elements you want to scan in your app. Notice they turn red as you click them. This indicates the object has been successfully detected by the scanner and registered.
    • Once you're finished re-open the extension and hit 'Stop'. If you need to take a break from scanning or need to perform an interaction on the page (e.g. opening a sub-menu) you can click pause and then resume scanning on the desired objects.
  6. Review scanned items by clicking the review button. Here, you can edit the identifiers chosen and even manually add your own scans for any objects that haven't been picked up by the scanner (this may happen for advanced user-interface types and actions).
  7. Upload the scan to the TestModeller.io portal.
    • Click the upload button.
    • Select where to create the page objects with the associated scanned elements into your workspace.
    • Also don't forget to name your creation.
      Note: you'll need to provide a unique name for the module or you'll be asked to perform a merge against an existing object (this is useful if you need to perform maintenance against an existing object).

Integrate The Page Object Code

  1. Navigate in TestModeller.io to the location you uploaded the page object.
  2. Two files should be present. Firstly, a page object which contains the identifiers for the scanned objects. Secondly, an automation module which contains the physical implementation of the page object (in this case the associated java page object). Learn more about these files here
  3. Open the automation module (highlighted above).
  4. Click the download button to retrieve and download the corresponding automation code for the module.
  5. Place this code in your framework. Using the example framework (above) the page objects you should copy this .java file into the framework\src\main\java\Pages directory.
Tip
Compile to check the generated code is valid

It is useful to check your automation framework is up to date and compiling correctly. Within the automation framework directory you can perform a compilation at any time using the mvn clean package command

5. Build a model

Build a Model

Start creating an automation model of the system under test.

If you'd like to learn more about building models we recommend reviewing our knowledge base articles on creating models here.
6. Generate automation code

Generate Automation

Generate associated Java automation code for your model.

Generate Coverage Focused Tests

Test cases are equivalent to paths through the model of a system under test. They are generated automatically from a model, with or without test data and test automation associated with them. Coverage techniques are also available to generate the smallest set of test cases needed to test given features with a required level of rigour.

  1. To generate test cases, navigate to the Generate tab of the menu and click “Generate”
  2. TestModeller.io will provide status updates as the tests are generated.
  3. To browse the generated tests, click “Tests” in the Generate tab of the menu. This will open the Test Cases side bar, displaying any created tests.
  4. Clicking on a test will highlight the path through a model’s logic which that test reflects.
Tip
Test Coverage

The tests generated by TestModeller.io are the optimal set of tests to maximise coverage across the model. You can learn more about test coverage and how to edit coverage settings within TestModeller.io at our knowledge base here.

Export Test Automation Code

Once you have created a model with overlaid automation, and a test suite containing associated paths, you are ready to create automation scripts for the framework being consumed, in this case Java using Selenium.

  1. Click the execute button in the test path side bar.
  2. Select the automation server you have configured. If you are using our Partner or Cloud workspace you can use our 'Community Server' which is already configured for your workspace.
    Note: The community server is a shared instance and may get busy at peak times. You may want to create your own automation server for a faster experience. Documentation is available here for creating your own server.
  3. Select the job 'Create Tests' from the dialog window.
  4. Select the code template to use. In this case we will use 'Java Selenium'.
  5. Once the job is complete there will be an option to download 'Result.zip'. This contains associated data spreadsheets, log files and most importantly the generated automation code.
7. Execute tests

Execute Automated Tests

Take the automation scripts generated by TestModeller.io and integrate them into your automation framework for execution.

Integrate Automation Into Framework

  1. Open the Results.zip file previously downloaded.
  2. Navigate to code folder - here you will see the .java files that have been autogenerated by TestModeller.io.
  3. Copy the generated java file into the automation framework. Navigate to the framework\src\test\java\Tests folder and paste the file.
  4. It is useful to do a new compile to check all the code is valid and operational.
    Note if you have pasted this into a different location within the framework you may need to adjust the import statements to reflect the new framework structure of the code.

Execute Tests

You can run the tests within the IntelliJ IDE by right clicking on the test case and selecting to run it. Here we will run the entire test suite through the command line.

  1. Navigate to the Java framework directory (this location should contain the pom.xml file in the root).
  2. Run mvn test. You should see your tests execute.
Tip
TestNG

The example automation framework uses TestNG as the test execution runner and results engine. You can tag tests, and also specify exactly which tests to run within TestNG either on your local machine or within your CI execution environment. We reccomend referring to the TestNG documentation here to learn more about configuring TestNG for your requirements.

8. Import existing framework / custom page objects (Advanced)

Import Existing Page Objects

Import existing or custom coded page objects into TestModeller.io to utilise them for creating automated models.

The page object importer is a vital component for test automation with TestModeller. This is useful for two reasons. Firstly, it may be the case that you have an existing automation framework with page objects already defined. Secondly there may be instances where you need to embed some custom code into TestModeller.io to perform specific actions which are not directly available within TestModeller. TestModeller.io supports full synchronisation with page objects from code, that means you can keep editing code and resynchronising into TestModeler at any time. If your changes effects any your models we notify you of the impacted models which need updating.

  1. The page object importer works on collections of code files. Therefore, you must first place the objects or framework files that you want to register into TestModeller.io into a ZIP file.
  2. Open TestModeller.io and login to your account.
  3. Optional - If you are hosting TestModeller.io on-premise or have your own automation server which you'd like to use for code generation we recommend linking your server to the current project. To do this you need to:
    • Go to projects in the sidebar.
    • Select the project you are currently working on.
    • Open the settings panel.
    • Select the automation server to link and click save.
  4. Go to the models view.
  5. Click the 'import' button and select to import 'Code Page Object'.
  6. A dialog will appear. This is where you can specify the zip file with your code definitions to synchronise.
  7. Once this is complete, navigate to the folder you selected to perform the import in and the associated modules will have been imported.
    Note: If you are importing an object that has already been registered in TestModeller.io it will be synchronised with the existing object and no new modules will be created.
Tip
Page object synchronisation

TestModeller.io features a full syncronisation engine for page objects. TestModeller.io will first attempted to do this using a GUID if one is defined in the class. You'll notice for page objects generated from TestModeller.io it does this by embedding the @TestModellerModuleId annotation at the top of the class with an associated GUID already defined. If there is no matching class for the GUID it will search for an object with the same path and name within the project. Otherwise a new module is created and no synchronisation occurs.

9. Edit code templates (Advanced)

Edit Code Templates

If you have your own automation framework it will be architectured in a particular way with specific naming conventions and coding standards. Everything in TestModeller.io previously created was done so using code templates which define the structure and type of code to be created. In this section, we'll review the associated templates and where to edit them.

Create Code Template

  1. Go to the configuration tab under the workspace sidebar submenu.
  2. Select the code template tab within the configuration page.
  3. Click the 'New Template' button to create a new code template.
  4. You will be presented with a dialog and asked to specify an appropriate template name. You can select two types of template to produce. Either a page object, or a test case template. It is often easier to select an existing template to copy from and then edit it to create your desired code template.
  5. Once the template is created you can open it and edit associated code, along with adding new code snippets. You'll find the list of the available keywords below the template that can be plugged into your template files.

Consume a Custom Page Object Template

  1. Once a page object template is created you will want to use it in your framework.
  2. Navigate to the projects and releases tab in the sidebar.
  3. Select the project you want the code template to be applied to.
  4. Finally, navigate to settings within the project and set the automation server along with the page object template to the associated values.
  5. Next time you perform a scan (as shown in section 3.) it will utilise this configuration for the project to create the associated module and automation code.

Consume a Custom Test Case Template

  1. Once you have generated tests in TestModeller.io and are in the execution screen (as shown in section 5.).
  2. Select the 'Create tests' jobs as previously shown.
  3. This time you can specify the new code template you have created. The automation scripts will be generated using the specified template and appear in the resulting /code directory for consumption into your automation framework.
10. Extend TestModeller (Advanced)

Page object scanning and editing templates / assigned actions

Editing scanned automation code directly in test modeller

11. Common Problems
Java 9 Support
Failed to execute goal org.apache.maven.plugins:maven-surefire-plugin:2.21.0:test (default-test) on project SeleniumFramework: There are test failures.

The example java framework has been built for Java 8. This error is caused because of the use of Java 9 instead of Java 8. The easiest solution would be to switch to Java 8 JRE. It is also possible to upgrade the Framework to work with Java 9.